Hello
I have bought two Creality printers and set them up side by side in the same room, on different tables next to each other. One is working fine, the other is not. They are both Ender-3 S Plus.
Here is a picture of the printer job in progress that is going okay on the good printer:

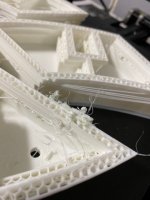
And here are some pictures of the job on the other one, that is messed up:


It looks like the problem is caused at these hard bunches of filament that prevent the head from moving if it runs into them and the machine looses position:

They both use the same filament:

and both use these same settings:

What is going on? Can anyone offer a suggestion?
Thanks in advance.
Sanyi.
I have bought two Creality printers and set them up side by side in the same room, on different tables next to each other. One is working fine, the other is not. They are both Ender-3 S Plus.
Here is a picture of the printer job in progress that is going okay on the good printer:
And here are some pictures of the job on the other one, that is messed up:
It looks like the problem is caused at these hard bunches of filament that prevent the head from moving if it runs into them and the machine looses position:
They both use the same filament:
and both use these same settings:
What is going on? Can anyone offer a suggestion?
Thanks in advance.
Sanyi.
")